JavaのOOMのコマンドラインオプション
JavaのOOMのコマンドラインオプションについての備忘録。
ソースコード
OOMが発生するソースコード。
public class Main {
    public static void main(String[] args) {
        byte[] buff = new byte[Integer.MAX_VALUE];
    }
}
Demo
今回はOpen JDK 17を使う。
% sdk use java 17.0.1-open
オプションなし
% java Main.java
Exception in thread "main" java.lang.OutOfMemoryError: Requested array size exceeds VM limit
    at Main.main(Main.java:3)
HeapDumpOnOutOfMemoryError
OOM発生時にヒープダンプを出力する。
% java -XX:+HeapDumpOnOutOfMemoryError Main.java
java.lang.OutOfMemoryError: Requested array size exceeds VM limit
Dumping heap to java_pid37573.hprof ...
Heap dump file created [26773152 bytes in 0.063 secs]
Exception in thread "main" java.lang.OutOfMemoryError: Requested array size exceeds VM limit
    at Main.main(Main.java:3)
ヒープダンプのファイル名を指定する場合。
% java -XX:+HeapDumpOnOutOfMemoryError -XX:HeapDumpPath=./heapdump.hprof Main.java
java.lang.OutOfMemoryError: Requested array size exceeds VM limit
Dumping heap to ./heapdump.hprof ...
Heap dump file created [26774126 bytes in 0.058 secs]
Exception in thread "main" java.lang.OutOfMemoryError: Requested array size exceeds VM limit
    at Main.main(Main.java:3)
OnOutOfMemoryError
OOM発生時にコマンドやスクリプトを実行する。
% java -XX:OnOutOfMemoryError="echo %p" Main.java
#
# java.lang.OutOfMemoryError: Requested array size exceeds VM limit
# -XX:OnOutOfMemoryError="echo %p"
#   Executing "echo 61311"...
61311
Exception in thread "main" java.lang.OutOfMemoryError: Requested array size exceeds VM limit
    at Main.main(Main.java:3)
% java -XX:OnOutOfMemoryError="kill -9 %p" Main.java
#
# java.lang.OutOfMemoryError: Requested array size exceeds VM limit
# -XX:OnOutOfMemoryError="kill -9 %p"
#   Executing "kill -9 20112"...
zsh: killed     java -XX:OnOutOfMemoryError="kill -9 %p" Main.java
ExitOnOutOfMemoryError
OOM発生時に終了する。
% java -XX:+ExitOnOutOfMemoryError Main.java
Terminating due to java.lang.OutOfMemoryError: Requested array size exceeds VM limit
CrashOnOutOfMemoryError
OOM発生時にエラーファイルを出力して終了する。
% java -XX:+CrashOnOutOfMemoryError Main.java
Aborting due to java.lang.OutOfMemoryError: Requested array size exceeds VM limit
#
# A fatal error has been detected by the Java Runtime Environment:
#
#  Internal Error (debug.cpp:364), pid=74771, tid=7683
#  fatal error: OutOfMemory encountered: Requested array size exceeds VM limit
#
# JRE version: OpenJDK Runtime Environment (17.0.1+12) (build 17.0.1+12-39)
# Java VM: OpenJDK 64-Bit Server VM (17.0.1+12-39, mixed mode, sharing, tiered, compressed oops, compressed class ptrs, g1 gc, bsd-amd64)
# Core dump will be written. Default location: /cores/core.74771
#
# An error report file with more information is saved as:
# /xxxx/hs_err_pid74771.log
zsh: abort      java -XX:+CrashOnOutOfMemoryError Main.java
参考
- https://docs.oracle.com/en/java/javase/17/troubleshoot/prepare-java-troubleshooting.html
- https://docs.oracle.com/en/java/javase/17/troubleshoot/troubleshooting-memory-leaks.html
- https://www.oracle.com/java/technologies/javase/8u92-relnotes.html
- https://github.com/openjdk/jdk/blob/jdk-17-ga/src/hotspot/share/utilities/debug.cpp#L351-L371
JFRでdirect memory statisticsを見る
JDK 15からdirect memory statisticsのJFR eventが追加されたので試したときのメモ。
準備
ソースコード
Nettyで確認したいので、Spring WebFluxを使う。Spring InitializrからWebFluxのプロジェクトを作成して、RestControllerを追加しただけ。
build.gradle
plugins {
    id 'org.springframework.boot' version '2.5.6'
    id 'io.spring.dependency-management' version '1.0.11.RELEASE'
    id 'java'
}

group = 'com.example'
version = '0.0.1-SNAPSHOT'
sourceCompatibility = '17'

repositories {
    mavenCentral()
}

dependencies {
    implementation 'org.springframework.boot:spring-boot-starter-webflux'
    testImplementation 'org.springframework.boot:spring-boot-starter-test'
    testImplementation 'io.projectreactor:reactor-test'
}

test {
    useJUnitPlatform()
}
DemoApplication.java
@SpringBootApplication
public class DemoApplication {
    public static void main(String[] args) {
        SpringApplication.run(DemoApplication.class, args);
    }
}
HelloController.java
@RestController
public class HelloController {
    @GetMapping
    public Mono<String> hello() {
        return Mono.just("Hello!");
    }
}
Demo
Flight Recorderを有効にしてアプリを実行する。
% sdk use java 17.0.1-open

% java -XX:StartFlightRecording:filename=recording1.jfr -jar build/libs/demo-0.0.1-SNAPSHOT.jar
記録したJFRファイルをJDK Mission Controlで開くと、Direct Buffer Statisticsが確認できた。

参考
- [JDK-8238665] Add JFR event for direct memory statistics - Java Bug System
- https://github.com/openjdk/jdk/blob/jdk-17+35/src/jdk.jfr/share/classes/jdk/jfr/events/AbstractBufferStatisticsEvent.java
- https://github.com/openjdk/jdk/blob/jdk-17%2B35/src/jdk.jfr/share/classes/jdk/jfr/events/DirectBufferStatisticsEvent.java
Homebrewで過去のversionをインストールする
Homebrewで過去のversionのpackageをインストールしたいときの備忘録。
以前はGitHubのcommit URLを指定してbrew installできていたが、この方法は使えなくなったので、代わりにbrew extractコマンドを使う必要がある。
手順
自分のtapがない場合は作成する。
% brew tap-new hirakida/tap
インストールしたいversionのpackageをextractコマンドで抽出する。今回はcmakeの3.19.7を抽出する。
% brew extract cmake hirakida/tap --version 3.19.7
抽出したversionをインストールする。
% brew install hirakida/tap/cmake@3.19.7
最新のversionがリンクされている場合は、一度アンリンクしてからインストールしたversionをリンクする。
% brew unlink cmake
% brew link cmake@3.19.7

% cmake --version
cmake version 3.19.7
参考
JDK Flight Recorderのイベントを作る
JDK Flight Recorder (JFR) のイベントを作ったときのメモ。
準備
JDK Misson Control (JMC)
ここからダウンロードしてインストールする。
ソースコード
import java.util.concurrent.TimeUnit;

import jdk.jfr.Category;
import jdk.jfr.Description;
import jdk.jfr.Event;
import jdk.jfr.Label;
import jdk.jfr.Name;

public class HelloMain {

    @Name("hirakida.Hello")
    @Label("Hello")
    @Category("JFR Demo")
    @Description("Hello Event")
    static class HelloEvent extends Event {
        @Label("Message")
        String message;
    }

    public static void main(String[] args) throws Exception {
        while (true) {
            HelloEvent event = new HelloEvent();
            event.message = "Hello!";
            event.begin();

            // eventのduration確認用
            TimeUnit.SECONDS.sleep(1);

            event.commit();
        }
    }
}
Demo
JFRを有効にしてデモアプリを実行する。
% sdk use java 15.0.2.hs-adpt

% java -XX:StartFlightRecording:filename=hello.jfr HelloMain.java
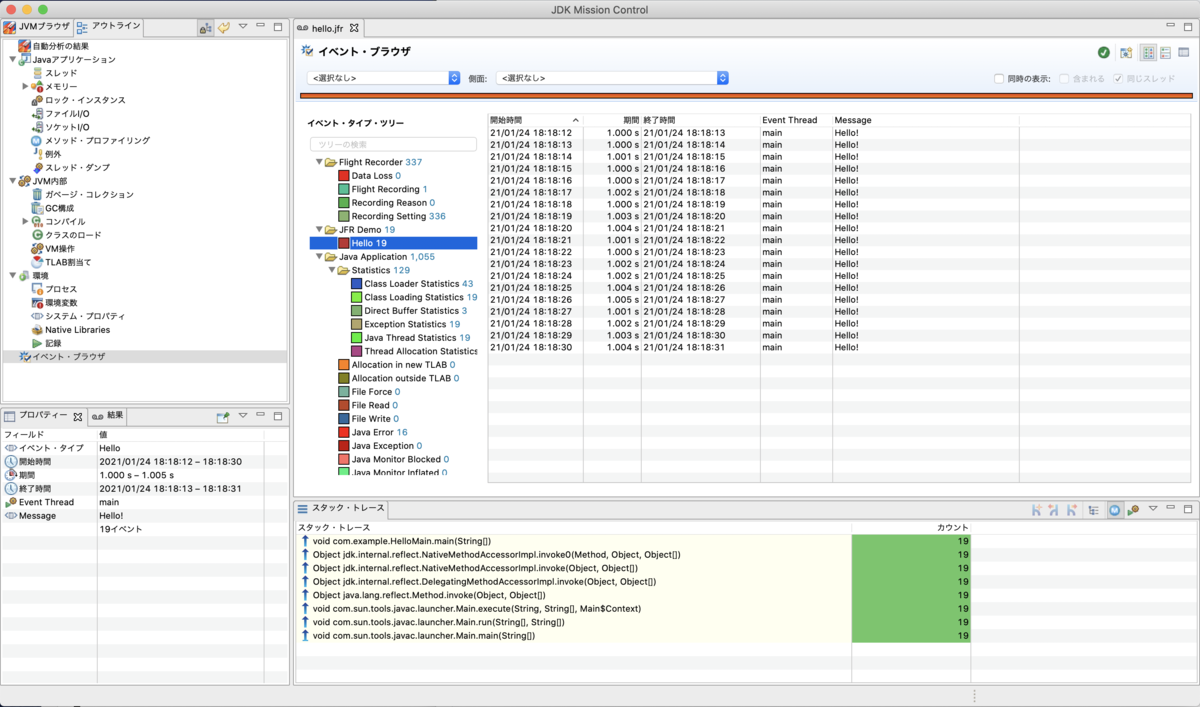
JMC
JMCでhello.jfrを開くと、追加したHelloイベントが確認できる。
jfrコマンド
JDK 12から追加されたjfrコマンドでも確認できる。
% jfr print --events Hello hello.jfr
hirakida.Hello {
  startTime = 01:13:44.276
  duration = 1.00 s
  message = "Hello!"
  eventThread = "main" (javaThreadId = 1)
  stackTrace = [
    com.example.HelloMain.main(String[]) line: 28
    jdk.internal.reflect.NativeMethodAccessorImpl.invoke0(Method, Object, Object[])
    jdk.internal.reflect.NativeMethodAccessorImpl.invoke(Object, Object[]) line: 64
    jdk.internal.reflect.DelegatingMethodAccessorImpl.invoke(Object, Object[]) line: 43
    java.lang.reflect.Method.invoke(Object, Object[]) line: 564
    ...
  ]
}

...
jsonで表示する場合
% jfr print --json --events Hello hello.jfr
{
  "recording": {
    "events": [{
      "type": "hirakida.Hello",
      "values": {
        "startTime": "2021-01-26T01:13:44.276284035+09:00",
        "duration": "PT1.000242742S",
        "eventThread": {
          "osName": "main",
          "osThreadId": 9475,
          "javaName": "main",
          "javaThreadId": 1,
          "group": {
            "parent": {
              "parent": null,
              "name": "system"
            },
            "name": "main"
          }
        },
...
参考
Spring BootのFlightRecorderApplicationStartupを試す
Spring Boot 2.4 (Spring Framework 5.3) から追加されたFlightRecorderApplicationStartupを試したときのメモ。
追記
このバグがあるので、Spring Boot 2.4.7 (Spring Framework 5.3.8) 以降を使ったほうがいい。
https://github.com/spring-projects/spring-framework/issues/26941
準備
JDK Mission Control
ここからJDK Mission Controlをダウンロードしてインストールする。
ソースコード
build.gradle
plugins {
    id 'org.springframework.boot' version '2.4.2'
    id 'io.spring.dependency-management' version '1.0.11.RELEASE'
    id 'java'
}

group = 'com.example'
version = '0.0.1-SNAPSHOT'
sourceCompatibility = '11'

repositories {
    mavenCentral()
}

dependencies {
    implementation 'org.springframework.boot:spring-boot-starter'
    testImplementation 'org.springframework.boot:spring-boot-starter-test'
}

test {
    useJUnitPlatform()
}
DemoApplication.java
@SpringBootApplication
public class DemoApplication implements CommandLineRunner {

    public static class Foo {}

    @Bean
    public Foo foo() {
        try {
            // duration確認用に5秒sleepを入れる
            TimeUnit.SECONDS.sleep(5);
        } catch (Exception ignored) { }
        return new Foo();
    }

    @Override
    public void run(String... args) {
        System.out.println("Hello!");
    }

    public static void main(String[] args) {
        SpringApplication app = new SpringApplication(DemoApplication.class);
        app.setApplicationStartup(new FlightRecorderApplicationStartup());
        app.run(args);
    }
}
Demo
Flight Recorderを有効にしてデモアプリを実行すると、jfrファイルが作成される。
(filenameとdurationはとりあえずマニュアルと同じ)
% sdk use java 11.0.10.hs-adpt

% java -XX:StartFlightRecording:filename=recording.jfr,duration=10s -jar build/libs/demo-0.0.1-SNAPSHOT.jar
JDK Mission Controlでjfrファイルを開くと、イベント・ブラウザ => 「Spring Application」カテゴリ => 「Startup Step」イベントで、foo beanのspring.beans.instantiateに5秒かかっているのが確認できた。

参考
- https://docs.spring.io/spring-boot/docs/2.4.x/reference/htmlsingle/#boot-features-application-startup-tracking
- https://github.com/spring-projects/spring-framework/issues/24878
- https://www.youtube.com/watch?t=1091s&v=lgyO9C9zdrg&feature=youtu.be
ソースコードはこの辺り
- https://github.com/spring-projects/spring-framework/blob/v5.3.3/spring-beans/src/main/java/org/springframework/beans/factory/support/AbstractBeanFactory.java#L303
- https://github.com/spring-projects/spring-framework/blob/v5.3.3/spring-core/src/main/java/org/springframework/core/metrics/jfr/FlightRecorderApplicationStartup.java
- https://github.com/spring-projects/spring-framework/blob/v5.3.3/spring-core/src/main/java/org/springframework/core/metrics/jfr/FlightRecorderStartupStep.java
- https://github.com/spring-projects/spring-framework/blob/v5.3.3/spring-core/src/main/java/org/springframework/core/metrics/jfr/FlightRecorderStartupEvent.java
Spring BootでRedis Cacheのmetricsを収集する
Spring Boot 2.4からRedis Cacheのmetricsが収集できるようになったので試してみた。
ソースコード
build.gradle
plugins {
    id 'org.springframework.boot' version '2.4.1'
    id 'io.spring.dependency-management' version '1.0.10.RELEASE'
    id 'java'
}

group = 'com.example'
version = '0.0.1-SNAPSHOT'
sourceCompatibility = '11'

repositories {
    mavenCentral()
}

dependencies {
    implementation 'org.springframework.boot:spring-boot-starter-web'
    implementation 'org.springframework.boot:spring-boot-starter-cache'
    implementation 'org.springframework.boot:spring-boot-starter-data-redis'
    implementation 'org.springframework.boot:spring-boot-starter-actuator'
    implementation 'io.micrometer:micrometer-registry-prometheus'
    testImplementation 'org.springframework.boot:spring-boot-starter-test'
}

test {
    useJUnitPlatform()
}
DemoApplication.java
@SpringBootApplication
@EnableCaching
public class DemoApplication {
    public static void main(String[] args) {
        SpringApplication.run(DemoApplication.class, args);
    }
}
HelloController.java
@RestController
public class HelloController {
    private final HelloService helloService;

    public HelloController(HelloService helloService) {
        this.helloService = helloService;
    }

    @GetMapping("/hello")
    public String hello() {
        return helloService.hello();
    }
}
HelloService.java
@Service
public class HelloService {
    @Cacheable(cacheNames = "cache1")
    public String hello() {
        return "Hello!";
    }
}
application.yml
Redisはデフォルトのlocalhost:6379を使う。
spring:
  cache:
    cache-names: cache1
    redis:
      enable-statistics: true
management:
  endpoints:
    web:
      exposure:
        include: prometheus
確認
アプリを起動して/helloに数回アクセスした後でActuatorのprometheus endpointを参照すると、cacheのhitやmissなどのmetricsが確認できた。
http://localhost:8080/actuator/prometheus
# HELP cache_puts_total The number of entries added to the cache
# TYPE cache_puts_total counter
cache_puts_total{cache="cache1",cacheManager="cacheManager",name="cache1",} 1.0
# HELP cache_gets_total the number of times cache lookup methods have returned an uncached (newly loaded) value, or null
# TYPE cache_gets_total counter
cache_gets_total{cache="cache1",cacheManager="cacheManager",name="cache1",result="miss",} 1.0
cache_gets_total{cache="cache1",cacheManager="cacheManager",name="cache1",result="pending",} 0.0
cache_gets_total{cache="cache1",cacheManager="cacheManager",name="cache1",result="hit",} 6.0
参考
RxJavaの備忘録(flatMap, concatMap, concatMapEager)
このメソッドのように、別スレッドで動く処理を呼び出したときのflatMap, concatMap, concatMapEagerの違いについての備忘録。
plugins {
    id 'java'
}

group = 'com.example'
version = '0.0.1-SNAPSHOT'
sourceCompatibility = '11'

repositories {
    mavenCentral()
}

dependencies {
    annotationProcessor 'org.projectlombok:lombok:1.18.16'
    compileOnly 'org.projectlombok:lombok:1.18.16'
    implementation 'io.reactivex.rxjava2:rxjava:2.2.20'
    implementation 'ch.qos.logback:logback-classic:1.2.3'
}
Flowable<Integer> getItems(int id) {
    return Flowable.just(id, id * 10, id * 100)
                   .subscribeOn(Schedulers.newThread())
                   .doOnNext(item -> log.info("getItems: {}", item));
}
flatMap
getItems()は異なる順番で呼ばれ、subscribe()も異なる順番で通知される
Flowable.range(1, 3)
        .flatMap(this::getItems)
        .subscribe(item -> log.info("subscribe: {}", item));
16:50:50.090 [RxNewThreadScheduler-3] INFO com.example.Main - getItems: 3
16:50:50.090 [RxNewThreadScheduler-2] INFO com.example.Main - getItems: 2
16:50:50.090 [RxNewThreadScheduler-1] INFO com.example.Main - getItems: 1
16:50:50.096 [RxNewThreadScheduler-3] INFO com.example.Main - subscribe: 3
16:50:50.096 [RxNewThreadScheduler-3] INFO com.example.Main - getItems: 30
16:50:50.096 [RxNewThreadScheduler-3] INFO com.example.Main - subscribe: 30
16:50:50.096 [RxNewThreadScheduler-3] INFO com.example.Main - getItems: 300
16:50:50.096 [RxNewThreadScheduler-3] INFO com.example.Main - subscribe: 300
16:50:50.097 [RxNewThreadScheduler-1] INFO com.example.Main - getItems: 10
16:50:50.097 [RxNewThreadScheduler-2] INFO com.example.Main - subscribe: 1
16:50:50.097 [RxNewThreadScheduler-1] INFO com.example.Main - getItems: 100
16:50:50.097 [RxNewThreadScheduler-2] INFO com.example.Main - subscribe: 10
16:50:50.097 [RxNewThreadScheduler-2] INFO com.example.Main - subscribe: 100
16:50:50.097 [RxNewThreadScheduler-2] INFO com.example.Main - subscribe: 2
16:50:50.097 [RxNewThreadScheduler-2] INFO com.example.Main - getItems: 20
16:50:50.097 [RxNewThreadScheduler-2] INFO com.example.Main - subscribe: 20
16:50:50.098 [RxNewThreadScheduler-2] INFO com.example.Main - getItems: 200
16:50:50.098 [RxNewThreadScheduler-2] INFO com.example.Main - subscribe: 200
maxConcurrency = 1
maxConcurrencyを1にした場合は、getItems()は1つずつ順番に呼ばれ、subscribe()も順番に通知される
Flowable.range(1, 3)
        .flatMap(this::getItems, false, 1)
        .subscribe(item -> log.info("subscribe: {}", item));
17:04:41.265 [RxNewThreadScheduler-1] INFO com.example.Main - getItems: 1
17:04:41.270 [RxNewThreadScheduler-1] INFO com.example.Main - subscribe: 1
17:04:41.270 [RxNewThreadScheduler-1] INFO com.example.Main - getItems: 10
17:04:41.270 [RxNewThreadScheduler-1] INFO com.example.Main - subscribe: 10
17:04:41.270 [RxNewThreadScheduler-1] INFO com.example.Main - getItems: 100
17:04:41.270 [RxNewThreadScheduler-1] INFO com.example.Main - subscribe: 100
17:04:41.270 [RxNewThreadScheduler-2] INFO com.example.Main - getItems: 2
17:04:41.270 [RxNewThreadScheduler-2] INFO com.example.Main - subscribe: 2
17:04:41.270 [RxNewThreadScheduler-2] INFO com.example.Main - getItems: 20
17:04:41.271 [RxNewThreadScheduler-2] INFO com.example.Main - subscribe: 20
17:04:41.271 [RxNewThreadScheduler-2] INFO com.example.Main - getItems: 200
17:04:41.271 [RxNewThreadScheduler-2] INFO com.example.Main - subscribe: 200
17:04:41.271 [RxNewThreadScheduler-3] INFO com.example.Main - getItems: 3
17:04:41.271 [RxNewThreadScheduler-3] INFO com.example.Main - subscribe: 3
17:04:41.271 [RxNewThreadScheduler-3] INFO com.example.Main - getItems: 30
17:04:41.271 [RxNewThreadScheduler-3] INFO com.example.Main - subscribe: 30
17:04:41.271 [RxNewThreadScheduler-3] INFO com.example.Main - getItems: 300
17:04:41.271 [RxNewThreadScheduler-3] INFO com.example.Main - subscribe: 300
maxConcurrency = 2
17:14:12.448 [RxNewThreadScheduler-1] INFO com.example.Main - getItems: 1
17:14:12.448 [RxNewThreadScheduler-2] INFO com.example.Main - getItems: 2
17:14:12.454 [RxNewThreadScheduler-1] INFO com.example.Main - subscribe: 1
17:14:12.454 [RxNewThreadScheduler-1] INFO com.example.Main - getItems: 10
17:14:12.454 [RxNewThreadScheduler-1] INFO com.example.Main - subscribe: 10
17:14:12.454 [RxNewThreadScheduler-1] INFO com.example.Main - getItems: 100
17:14:12.454 [RxNewThreadScheduler-1] INFO com.example.Main - subscribe: 100
17:14:12.454 [RxNewThreadScheduler-3] INFO com.example.Main - getItems: 3
17:14:12.454 [RxNewThreadScheduler-3] INFO com.example.Main - subscribe: 3
17:14:12.455 [RxNewThreadScheduler-3] INFO com.example.Main - getItems: 30
17:14:12.455 [RxNewThreadScheduler-3] INFO com.example.Main - subscribe: 30
17:14:12.455 [RxNewThreadScheduler-3] INFO com.example.Main - getItems: 300
17:14:12.455 [RxNewThreadScheduler-3] INFO com.example.Main - subscribe: 300
17:14:12.455 [RxNewThreadScheduler-3] INFO com.example.Main - subscribe: 2
17:14:12.455 [RxNewThreadScheduler-2] INFO com.example.Main - getItems: 20
17:14:12.455 [RxNewThreadScheduler-2] INFO com.example.Main - subscribe: 20
17:14:12.455 [RxNewThreadScheduler-2] INFO com.example.Main - getItems: 200
17:14:12.455 [RxNewThreadScheduler-2] INFO com.example.Main - subscribe: 200
concatMap
getItems()は1つずつ順番に呼ばれ、subscribe()も順番に通知される
Flowable.range(1, 3)
        .concatMap(this::getItems)
        .subscribe(item -> log.info("subscribe: {}", item));
16:54:14.618 [RxNewThreadScheduler-1] INFO com.example.Main - getItems: 1
16:54:14.622 [RxNewThreadScheduler-1] INFO com.example.Main - subscribe: 1
16:54:14.622 [RxNewThreadScheduler-1] INFO com.example.Main - getItems: 10
16:54:14.622 [RxNewThreadScheduler-1] INFO com.example.Main - subscribe: 10
16:54:14.622 [RxNewThreadScheduler-1] INFO com.example.Main - getItems: 100
16:54:14.622 [RxNewThreadScheduler-1] INFO com.example.Main - subscribe: 100
16:54:14.623 [RxNewThreadScheduler-2] INFO com.example.Main - getItems: 2
16:54:14.623 [RxNewThreadScheduler-2] INFO com.example.Main - subscribe: 2
16:54:14.623 [RxNewThreadScheduler-2] INFO com.example.Main - getItems: 20
16:54:14.623 [RxNewThreadScheduler-2] INFO com.example.Main - subscribe: 20
16:54:14.623 [RxNewThreadScheduler-2] INFO com.example.Main - getItems: 200
16:54:14.623 [RxNewThreadScheduler-2] INFO com.example.Main - subscribe: 200
16:54:14.623 [RxNewThreadScheduler-3] INFO com.example.Main - getItems: 3
16:54:14.623 [RxNewThreadScheduler-3] INFO com.example.Main - subscribe: 3
16:54:14.623 [RxNewThreadScheduler-3] INFO com.example.Main - getItems: 30
16:54:14.623 [RxNewThreadScheduler-3] INFO com.example.Main - subscribe: 30
16:54:14.623 [RxNewThreadScheduler-3] INFO com.example.Main - getItems: 300
16:54:14.623 [RxNewThreadScheduler-3] INFO com.example.Main - subscribe: 300
concatMapEager
getItems()は異なる順番で呼ばれるが、subscribe()は順番に通知される
Flowable.range(1, 3)
        .concatMapEager(this::getItems)
        .subscribe(item -> log.info("subscribe: {}", item));
16:55:41.393 [RxNewThreadScheduler-3] INFO com.example.Main - getItems: 3
16:55:41.393 [RxNewThreadScheduler-1] INFO com.example.Main - getItems: 1
16:55:41.398 [RxNewThreadScheduler-3] INFO com.example.Main - getItems: 30
16:55:41.393 [RxNewThreadScheduler-2] INFO com.example.Main - getItems: 2
16:55:41.398 [RxNewThreadScheduler-3] INFO com.example.Main - getItems: 300
16:55:41.398 [RxNewThreadScheduler-1] INFO com.example.Main - subscribe: 1
16:55:41.398 [RxNewThreadScheduler-2] INFO com.example.Main - getItems: 20
16:55:41.398 [RxNewThreadScheduler-1] INFO com.example.Main - getItems: 10
16:55:41.398 [RxNewThreadScheduler-2] INFO com.example.Main - getItems: 200
16:55:41.398 [RxNewThreadScheduler-1] INFO com.example.Main - subscribe: 10
16:55:41.398 [RxNewThreadScheduler-1] INFO com.example.Main - getItems: 100
16:55:41.398 [RxNewThreadScheduler-1] INFO com.example.Main - subscribe: 100
16:55:41.398 [RxNewThreadScheduler-1] INFO com.example.Main - subscribe: 2
16:55:41.398 [RxNewThreadScheduler-1] INFO com.example.Main - subscribe: 20
16:55:41.398 [RxNewThreadScheduler-1] INFO com.example.Main - subscribe: 200
16:55:41.399 [RxNewThreadScheduler-1] INFO com.example.Main - subscribe: 3
16:55:41.399 [RxNewThreadScheduler-1] INFO com.example.Main - subscribe: 30
16:55:41.399 [RxNewThreadScheduler-1] INFO com.example.Main - subscribe: 300
maxConcurrency = 1, prefetch = 1
Flowable.range(1, 3)
        .concatMapEager(this::getItems, 1, 1)
        .subscribe(item -> log.info("subscribe: {}", item));
17:11:06.375 [RxNewThreadScheduler-1] INFO com.example.Main - getItems: 1
17:11:06.380 [RxNewThreadScheduler-1] INFO com.example.Main - subscribe: 1
17:11:06.380 [RxNewThreadScheduler-1] INFO com.example.Main - getItems: 10
17:11:06.380 [RxNewThreadScheduler-1] INFO com.example.Main - subscribe: 10
17:11:06.380 [RxNewThreadScheduler-1] INFO com.example.Main - getItems: 100
17:11:06.380 [RxNewThreadScheduler-1] INFO com.example.Main - subscribe: 100
17:11:06.381 [RxNewThreadScheduler-2] INFO com.example.Main - getItems: 2
17:11:06.381 [RxNewThreadScheduler-2] INFO com.example.Main - subscribe: 2
17:11:06.381 [RxNewThreadScheduler-2] INFO com.example.Main - getItems: 20
17:11:06.381 [RxNewThreadScheduler-2] INFO com.example.Main - subscribe: 20
17:11:06.381 [RxNewThreadScheduler-2] INFO com.example.Main - getItems: 200
17:11:06.381 [RxNewThreadScheduler-2] INFO com.example.Main - subscribe: 200
17:11:06.381 [RxNewThreadScheduler-3] INFO com.example.Main - getItems: 3
17:11:06.381 [RxNewThreadScheduler-3] INFO com.example.Main - subscribe: 3
17:11:06.381 [RxNewThreadScheduler-3] INFO com.example.Main - getItems: 30
17:11:06.381 [RxNewThreadScheduler-3] INFO com.example.Main - subscribe: 30
17:11:06.381 [RxNewThreadScheduler-3] INFO com.example.Main - getItems: 300
17:11:06.381 [RxNewThreadScheduler-3] INFO com.example.Main - subscribe: 300
maxConcurrency = 2, prefetch = 2
17:12:52.364 [RxNewThreadScheduler-1] INFO com.example.Main - getItems: 1
17:12:52.364 [RxNewThreadScheduler-2] INFO com.example.Main - getItems: 2
17:12:52.370 [RxNewThreadScheduler-1] INFO com.example.Main - subscribe: 1
17:12:52.370 [RxNewThreadScheduler-2] INFO com.example.Main - getItems: 20
17:12:52.370 [RxNewThreadScheduler-1] INFO com.example.Main - getItems: 10
17:12:52.370 [RxNewThreadScheduler-1] INFO com.example.Main - subscribe: 10
17:12:52.370 [RxNewThreadScheduler-1] INFO com.example.Main - getItems: 100
17:12:52.370 [RxNewThreadScheduler-1] INFO com.example.Main - subscribe: 100
17:12:52.370 [RxNewThreadScheduler-1] INFO com.example.Main - subscribe: 2
17:12:52.370 [RxNewThreadScheduler-1] INFO com.example.Main - subscribe: 20
17:12:52.370 [RxNewThreadScheduler-3] INFO com.example.Main - getItems: 3
17:12:52.370 [RxNewThreadScheduler-3] INFO com.example.Main - getItems: 30
17:12:52.371 [RxNewThreadScheduler-2] INFO com.example.Main - getItems: 200
17:12:52.371 [RxNewThreadScheduler-2] INFO com.example.Main - subscribe: 200
17:12:52.371 [RxNewThreadScheduler-2] INFO com.example.Main - subscribe: 3
17:12:52.371 [RxNewThreadScheduler-2] INFO com.example.Main - subscribe: 30
17:12:52.371 [RxNewThreadScheduler-3] INFO com.example.Main - getItems: 300
17:12:52.371 [RxNewThreadScheduler-3] INFO com.example.Main - subscribe: 300
参考
http://reactivex.io/documentation/operators/flatmap.html
http://reactivex.io/RxJava/javadoc/io/reactivex/Observable.html
https://github.com/ReactiveX/RxJava/wiki/Transforming-Observables