GraalVMのNative Imageを試す
GraalVMのNative Imageを試したときのメモ。
ソースコード
public class HelloWorld {
    static {
        System.out.println("Static initialization");
    }
    public static void main(String[] args) {
        System.out.println("Hello world!");
    }
}
Demo
DockerのGraalVMを使う場合
カレントディレクトリにHelloWorld.javaを置いて、コンテナを起動する
% docker run -v `pwd`:/tmp -it oracle/graalvm-ce bash
native-imageコマンドをインストールする
bash-4.2# gu install native-image
bash-4.2# cd tmp
bash-4.2# mkdir out
bash-4.2# javac -d out/ HelloWorld.java
Native Imageを生成して実行する
bash-4.2# native-image -cp out/ HelloWorld
Build on Server(pid: 113, port: 42993)
[helloworld:113]    classlist:     208.02 ms
[helloworld:113]        (cap):     812.16 ms
[helloworld:113]        setup:   1,094.60 ms
[helloworld:113]   (typeflow):   2,439.05 ms
[helloworld:113]    (objects):   2,606.36 ms
[helloworld:113]   (features):     118.09 ms
[helloworld:113]     analysis:   5,267.27 ms
[helloworld:113]     (clinit):      61.06 ms
[helloworld:113]     universe:     190.47 ms
[helloworld:113]      (parse):     232.66 ms
[helloworld:113]     (inline):     653.02 ms
[helloworld:113]    (compile):   1,515.33 ms
[helloworld:113]      compile:   2,571.28 ms
[helloworld:113]        image:     216.05 ms
[helloworld:113]        write:     338.25 ms
[helloworld:113]      [total]:  10,010.49 ms
bash-4.2# time ./helloworld
Static initialization
Hello world!

real    0m0.015s
user    0m0.001s
sys 0m0.003s
--initialize-at-build-time を指定した場合
bash-4.2# native-image --initialize-at-build-time=HelloWorld -cp out/ HelloWorld
Build on Server(pid: 113, port: 42993)
[helloworld:113]    classlist:     161.72 ms
Static initialization
[helloworld:113]        (cap):     784.22 ms
[helloworld:113]        setup:   1,035.82 ms
[helloworld:113]   (typeflow):   2,543.74 ms
[helloworld:113]    (objects):   2,808.22 ms
[helloworld:113]   (features):     108.06 ms
[helloworld:113]     analysis:   5,550.17 ms
[helloworld:113]     (clinit):      61.06 ms
[helloworld:113]     universe:     226.54 ms
[helloworld:113]      (parse):     238.89 ms
[helloworld:113]     (inline):     757.67 ms
[helloworld:113]    (compile):   1,525.27 ms
[helloworld:113]      compile:   2,684.69 ms
[helloworld:113]        image:     213.52 ms
[helloworld:113]        write:     328.43 ms
[helloworld:113]      [total]:  10,317.39 ms
bash-4.2# time ./helloworld
Hello world!

real    0m0.016s
user    0m0.000s
sys 0m0.005s
Macで実行する場合
SDKMANでGraalVMをインストールする
% sdk install java 20.1.0.r11-grl
% sdk use java 20.1.0.r11-grl
native-imageコマンドをインストールする
% gu install native-image
% javac HelloWorld.java
Native Imageを生成して実行する
% native-image HelloWorld
% ./helloworld
Static initialization
Hello world!
Spring BootでRxJava2を使う
Spring Boot 2はRxJava2をサポートしているので、Spring MVCとSpring WebFluxどちらでも、Controllerの戻り値にFlowableなどを指定できる。
ソースコード
dependencies {
    implementation 'org.springframework.boot:spring-boot-starter-web'
    implementation 'io.reactivex.rxjava2:rxjava'
}
@RestController
public class HelloController {
    @GetMapping("/hello1")
    public Single<String> hello1() {
        return Single.just("Hello!");
    }

    @GetMapping("/hello2")
    public Flowable<String> hello2() {
        return Flowable.fromIterable(List.of("Hello!", "Hello!"));
    }

    @GetMapping(value = "/hello3", produces = MediaType.TEXT_EVENT_STREAM_VALUE)
    public Flowable<String> hello3() {
        return Flowable.fromIterable(List.of("Hello!", "Hello!"));
    }
}
参考
- https://docs.spring.io/spring-framework/docs/5.2.1.RELEASE/spring-framework-reference/web.html#mvc-ann-return-types
- https://docs.spring.io/spring-framework/docs/5.2.1.RELEASE/spring-framework-reference/web.html#mvc-ann-async-reactive-types
- https://docs.spring.io/spring-framework/docs/5.2.1.RELEASE/spring-framework-reference/web-reactive.html#webflux-ann-return-types
Spring BootとArmeriaでHTTP/2のh2cを試す
Spring BootはHTTP/2のh2c (HTTP/2 over TCP)をサポートしていないが、Armeriaを組み合わせると使用できる。
追記
- Spring Boot 2.3.5からh2cの設定方法がドキュメントに記載されたので、Armeriaを使わなくても試せるようになった。
https://docs.spring.io/spring-boot/docs/2.4.x/reference/html/howto.html#howto-configure-http2-h2c
- Spring Boot 2.5からはserver.http2.enabledをtrueにするだけでh2cを使用できるようになった。
https://github.com/spring-projects/spring-boot/wiki/Spring-Boot-2.5-Release-Notes
準備
ソースコード
Spring Initializrでプロジェクトを作成する。
https://start.spring.io/
application.propeties
http2を有効にする。
server.http2.enabled=true
build.gradle
Armeriaのdependenciesを追加する。
dependencies {
    implementation platform('com.linecorp.armeria:armeria-bom:1.0.0')
    implementation 'com.linecorp.armeria:armeria-spring-boot2-webflux-starter'
}
HelloController.java
Controllerを追加する。
@RestController
public class HelloController {
    @GetMapping("/hello")
    public Mono<String> hello() {
        return Mono.just("Hello!");
    }
}
動作確認
ブラウザはh2cをサポートしていないため、curlコマンドで確認する。
% curl -v --http2 http://localhost:8080/hello
*   Trying ::1...
* TCP_NODELAY set
* Connected to localhost (::1) port 8080 (#0)
> GET /hello HTTP/1.1
> Host: localhost:8080
> User-Agent: curl/7.54.0
> Accept: */*
> Connection: Upgrade, HTTP2-Settings
> Upgrade: h2c
> HTTP2-Settings: AAMAAABkAARAAAAAAAIAAAAA
>
< HTTP/1.1 101 Switching Protocols
< connection: upgrade
< upgrade: h2c
* Received 101
* Using HTTP2, server supports multi-use
* Connection state changed (HTTP/2 confirmed)
* Copying HTTP/2 data in stream buffer to connection buffer after upgrade: len=84
* Connection state changed (MAX_CONCURRENT_STREAMS updated)!
< HTTP/2 200
< content-type: text/plain;charset=UTF-8
< content-length: 6
<
* Connection #0 to host localhost left intact
Hello!
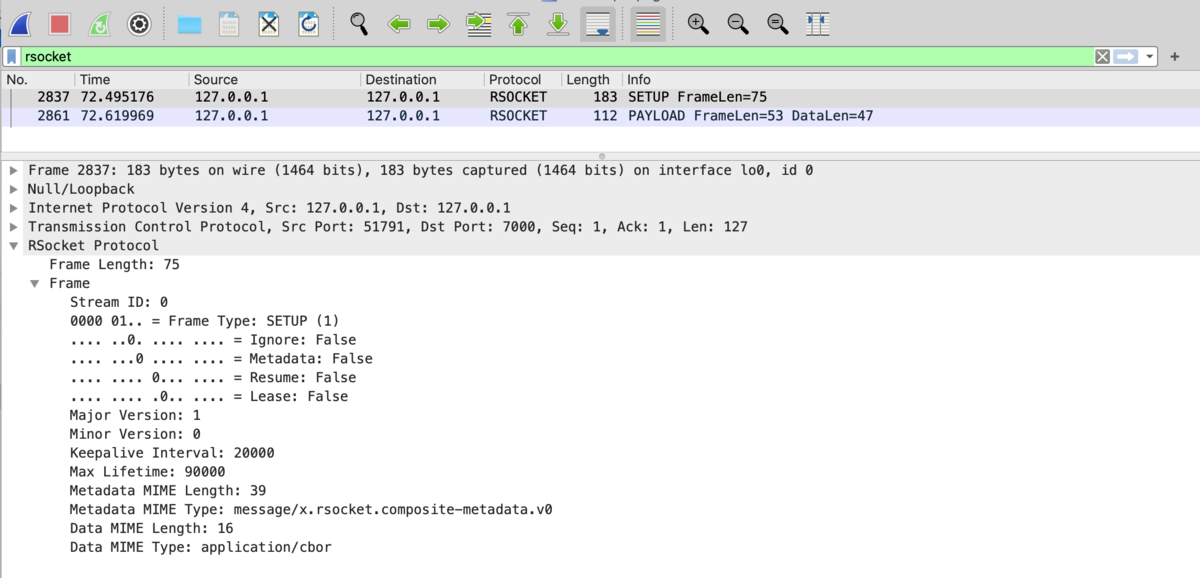
h2cなので、Wiresharkでも確認できる。


参考
https://docs.spring.io/spring-boot/docs/2.2.1.RELEASE/reference/html/howto.html#howto-configure-http2
https://armeria.dev/docs/advanced-spring-webflux-integration
https://github.com/spring-projects/spring-boot/issues/21997
WiresharkのプラグインをMacでビルドする
Cで書かれたWiresharkのプラグインをMacでビルドしたときのメモ。
手順
準備
Wiresharkをインストールする
% brew install wireshark --cask
インストールしたWiresharkと同じバージョンのソースコードをダウンロードする(今回は3.4.5)
% git clone https://github.com/wireshark/wireshark -b wireshark-3.4.5
ビルドに必要なライブラリをインストールする
% wireshark/tools/macos-setup-brew.sh
プラグインのソースコードをダウンロードする(今回はrsocketのプラグインを使う)
% git clone https://github.com/rsocket/rsocket-wireshark
ビルド
プラグインのソースコードをWiresharkのソースコードの中に置く
% mv rsocket-wireshark wireshark/plugins/epan/rsocket
CMakeListsCustom.txtを作成する
% cd wireshark/
% vi CMakeListsCustom.txt
CMakeListsCustom.txtにこの一行を追加して、カスタムプラグインのsrc dirを設定する
set(CUSTOM_PLUGIN_SRC_DIR plugins/epan/rsocket)
Wiresharkをビルドする
% mkdir build/
% cd build/
% cmake ..
% make
ビルドが成功すると、build/run/Wireshark.app/Contents/PlugIns/wireshark/3-4/epan/にプラグインの.soファイルが生成されるので、この.soファイルをインストールしたWiresharkのPluginsフォルダにコピーする
% cp run/Wireshark.app/Contents/PlugIns/wireshark/3-4/epan/rsocket.so /Applications/Wireshark.app/Contents/PlugIns/wireshark/3-4/epan/
Wiresharkの設定
(インストールした)Wiresharkを起動後、「Analyze」-> 「Decode As...」の画面で追加したプラグインを設定すると、プラグインが適用される

参考
https://www.wireshark.org/docs/wsdg_html/#ChSetupUNIXBuildEnvironmentSetup
https://www.wireshark.org/docs/wsug_html_chunked/ChPluginFolders.html
Maven/Gradleでdependencyのupdateをチェックする
MavenまたはGradleでdependencyのupdateをチェックしたいときの備忘録。
% mvn versions:display-dependency-updates
- Gradle
Gradleの場合はgradle-versions-pluginsを使用する。
% ./gradlew dependencyUpdates -Drevision=release
GradleでJava 13のプレビュー機能を試す
GradleでJava 13のプレビュー機能を試したときのメモ。
Gradleは6.0以降を使用する。
Gradle 6.0 Release Notes
ソースコード
build.gradle
--enable-previewを設定する
plugins {
    id 'java'
    id 'application'
}

group 'com.example'
version '1.0-SNAPSHOT'
sourceCompatibility = JavaVersion.VERSION_13

repositories {
    mavenCentral()
}

tasks.withType(JavaCompile) {
    options.compilerArgs += ['--enable-preview']
}

test {
    jvmArgs = ['--enable-preview']
}

run {
    jvmArgs = ['--enable-preview']
}

mainClassName = 'com.example.Main'
Main.java
今回はText BlocksとSwitch Expressionsを試す
JEP 368: Text Blocks (Second Preview)
JEP 361: Switch Expressions
package com.example;

public class Main {
    public static void main(String... args) {
        String message = """
        AAA
        BBB
        CCC
        """;
        System.out.println(message);

        System.out.println(isWeekend(DayOfWeek.FRIDAY));
        System.out.println(isWeekend(DayOfWeek.SUNDAY));
    }

    private static boolean isWeekend(DayOfWeek day) {
        return switch (day) {
            case SATURDAY, SUNDAY -> true;
            case MONDAY, TUESDAY, WEDNESDAY, THURSDAY, FRIDAY -> false;
        };
    }
}
実行結果
% ./gradlew run

> Task :run
AAA
BBB
CCC

false
true

BUILD SUCCESSFUL in 470ms
Java 14でNullPointerExceptionの詳細エラーメッセージを表示する
Java 14でNullPointerExceptionの詳細エラーメッセージを表示したいときのメモ。
※追記
Java 15からShowCodeDetailsInExceptionMessagesはデフォルトで有効になった。
https://bugs.openjdk.java.net/browse/JDK-8233014
Demo
Java 14をインストール後、ShowCodeDetailsInExceptionMessagesを有効にしてJShellを起動する
- SDKMANを使う場合
% sdk install java 14.0.0-open
% sdk use java 14.0.0-open

% jshell -R-XX:+ShowCodeDetailsInExceptionMessages
- dockerを使う場合
% docker run --rm -it openjdk:14.0.2-jdk jshell -R-XX:+ShowCodeDetailsInExceptionMessages
jshell> String message = null
message ==> null

jshell> System.out.println(message.length())
|  Exception java.lang.NullPointerException: Cannot invoke "String.length()" because "REPL.$JShell$11.message" is null
|        at (#2:1)

jshell> /exit
|  Goodbye